Precompiled Views with Sitecore 8.2

A while ago I wrote a post about speeding up your views with precompilation.

After writing that post I learned about RazorGenerator which Chris van de Steeg blogged about. RazorGenerator is better in just about every way compared to aspnet_compiler.exe. Whereas the aspnet_compiler just warms the compiler cache for the current machine, RazorGenerator builds the generated classes for your Razor files directly into your assemblies.

With RazorGenerator you can compile once and deploy everywhere. Getting started with it is almost stupidly simple. Seriously, I described the whole process in one tweet: Install the RazorGenerator.MsBuild NuGet package. That’s it. So what does that get you?

  • Compile-time view syntax checking. Ever deployed a Razor file that broke at runtime after a “successful” build? Well now your builds will fail if your Razor syntax is invalid. Hoorah!
  • Your Razor views are compiled into your output assembly (look at it in DotPeek and see the ASP namespace)
  • It’s fast. You probably won’t even notice the build time difference.

But that’s not quite all

Right, so how do you get your precompiled views to actually get loaded? ASP.NET MVC doesn’t understand how to resolve classes instead of files out of the box. With Sitecore 8.1 and earlier, you could use the RazorGenerator.Mvc NuGet package and wire up its PrecompiledViewEngine to accomplish this.

Sitecore 8.2 modernizes a lot of the MVC implementation under the covers, and part of that is that the Sitecore infrastructure now supports precompiled views natively! (Wondering why the experience editor starts up a lot faster in 8.2? That’s why.) It’s really easy to use, in fact: all you have to do is tell Sitecore which assemblies to look for precompiled views in and it does the rest. Behold:

<configuration xmlns:patch="http://www.sitecore.net/xmlconfig/">
  <sitecore>
    <mvc>
      <precompilation>
        <assemblies>
          <assemblyIdentity name="My.Project" />
          <assemblyIdentity name="My.OtherProject" />
        </assemblies>
      </precompilation>
    </mvc>
  </sitecore>
</configuration>

CAVEAT: The Sitecore precompiler is greedy by default. When it is on, if a class exists for your view, the physical file for the view is not checked. You can even delete it. This means that you cannot tweak the cshtml file and have updates be reflected. You can enable timestamp checking if you must by changing this setting:

<configuration xmlns:patch="http://www.sitecore.net/xmlconfig/">
  <sitecore>
    <settings>
      <!--  MVC: Flag for controlling whether Razor View Engine will look at physical view last modified dates 
        when determining to use a view file from a pre-compiled assembly or from the file system.
        Default: "false"
        -->
        <setting name="Mvc.UsePhysicalViewsIfNewer" value="false" />
      </settings>
  </sitecore>
</configuration>

Because there are (minor) performance implications of doing the timestamp checks, I would advise enabling this setting for development and disabling the setting for production. You should never, ever be changing files on production after a deployment anyway.

Recap

If you’re on Sitecore 8.2, you can get view performance gains by:

  • Installing RazorGenerator.MsBuild on each Visual Studio project that contains Razor views
  • Registering each of those assemblies with the Sitecore precompiled view engine so that it uses your precompiled classes for view rendering

Big thanks to Kern for setting up the MVC expert panel, without which this feature might well not exist. And we might still have 1:40 startup times after a compile. :)

Sitecore hangs on startup when using MongoDB

I ran across a tricky issue today where a Sitecore content delivery cluster would simply hang on startup. No errors in the logs. Nothing in the windows event logs. The content editing server worked just fine.

Mystifying, right? So it came down to process of elimination: I disabled analytics and removed all Mongo connection strings and the site worked. The obvious answer here would be “it’s a firewall issue.”

It wasn’t. mongo.exe could connect to the replica set just fine. The connection was using SSL, so I checked the server certificate. It was valid and trusted.

Eventually it came down to a few important facts:

  • We were using SSL.
  • Because we weren’t using client certificates, mongo.exe had to use --sslAllowInvalidCertificates, which meant that it was not verifying the server certificate.
  • The Mongo C# driver does validate the server certificate.

But you said the server certificate was totally valid, right? Right - and it was valid.

Except for the sneaky fact that the certificate had a Certificate Revocation List (CRL) URL embedded in it. The Mongo C# driver defaults to checking the CRL to make sure the server certificate is not revoked.

Normally that’s a good thing, but in this case the CRL was behind the firewall, and the delivery servers were not. So the CRL could not be checked, and the server certificate was treated as invalid due to that.

Why this results in straight up hanging the site instead of an error I’m not sure. But that leads to how it got fixed.

Extending the Mongo Client Settings

The most obvious fix would be to add something to the connection string to disable the CRL check, as it would be undesirable to expose the PKI server that issued the certificate to the DMZ where the delivery servers live. Unfortunately, there is no option to do that in the Mongo connection string format.

Fortunately, There’s A Micro-Pipeline For That™. Sitecore exposes the updateMongoDriverSettings pipeline, which is empty by default. This pipeline allows you to fool with the MongoClientSettings object and alter configurations that are not available in the connection string.

Here’s an example patch to add a processor to said pipeline:

<configuration xmlns:patch="http://www.sitecore.net/xmlconfig/">
    <sitecore>
        <pipelines>
            <updateMongoDriverSettings>
                <processor type="Me.Pipelines.UpdateMongoDriverSettings.DisableCrlChecks, Me"/>
            </updateMongoDriverSettings>
        </pipelines>
    </sitecore>
</configuration>

And the processor implementation that alters the MongoClientSettings to disable CRL checks:

using MongoDB.Driver;
using Sitecore.Analytics.Pipelines.UpdateMongoDriverSettings;

namespace Me.Pipelines.UpdateMongoDriverSettings
{
    public class DisableCrlChecks : UpdateMongoDriverSettingsProcessor
    {
        public override void UpdateSettings(UpdateMongoDriverSettingsArgs args)
        {
            args.MongoSettings.SslSettings = new SslSettings { CheckCertificateRevocation = false };
        }
    }
}

This technique could also be used to diagnose other SSL issues that might involve invalid certificates, because you can also alter the certificate validity handling to get diagnostic output.

Caveat: Sorry, not for you Mongo Session Provider

Unfortunately if you’re using the MongoDB Session State provider, it does not respect this pipeline. In fact, it makes itself highly extensible, by hiding the place to put your options in a private static method! Called by internal methods!

private static MongoCollection GetCollection(string connectionString, string databaseName, string collectionName)
{
    return (MongoCollection) new MongoClient(new MongoUrl(connectionString)).GetServer().GetDatabase(databaseName).GetCollection(collectionName);
}

So you’re hosed if you’re using Mongo sessions.

Dependency Injection in Sitecore 8.2

Sitecore 8.2, hot off the presses yesterday, includes built in dependency injection. If you’ve been following the internal architecture of Sitecore for very long, you’ve probably realized that a lot of it is uglier than it needs to be - and less extensible - thanks to the lack of system-wide DI support. It’s kind of a big deal. Even if Nat Mann hates conforming containers ;)

The Sitecore IoC container is based on Microsoft’s Dependency Injection library that was written for .NET Core. It is not the world’s most flexible or performant container (nor was it designed to be), but it works and is a decent choice. If you wish you can change the underlying IoC library being used, but we aren’t going to cover that today.

Sitecore’s built in DI offers two major advantages over the third party dependency injection that most advanced Sitecore teams have been using for a long time:

  • Sitecore itself is using it (and thus you can extend Sitecore itself by replacing dependencies)
  • You can natively dependency inject into pipeline processors (which you could sort of already do)

Controller Injection

As with most ASP.NET DI implementations, most dependency resolution will take place in controllers. If you’ve already been using constructor injection with Sitecore, you may have to change absolutely nothing:

public class FooController : Controller
{
    private readonly IDependency _dependency;

    public Foo(IDependency dependency) 
    {
        _dependency = dependency;
    }

    public ActionResult Index() 
    {
        return View(_dependency.DoStuff());
    }
}

Be aware that the built in IoC container has two major limitations when injecting controllers:

  • You may only have one public constructor for your controller - or any other registered dependency. This is a good thing, as multiple public constructors are a DI antipattern anyway.
  • The controller class must be registered with the container to be resolvable (e.g. you must register it such as container.AddTransient<FooController>()).

The latter limitation we can do something nice about: read on and we’ll get to that when we talk about registering dependencies :)

Pipeline Injection

You may also inject dependencies into pipeline processors using the same constructor injection pattern as controllers. Processors are not injected by default, presumably for performance. As with controllers, processors may only have one public constructor. I suspect, but have not tried, that this trick would also work with commands.

To inject a processor, simply add resolve="true" to its registration. For example:

<processor type="Foo.BarProcessor, Foo" resolve="true" />

Web Forms Dependency Injection

(You can actually do Web Forms DI with Sitecore but I’m not going to tell you how. Quit using Web Forms.)

Service Locator

You can also resolve dependencies from the Sitecore container using the Service Locator antipattern. This is where you explicitly ask the container to give you an instance of an object. It’s an antipattern, and you should use it as a weapon of last resort, because it tightly couples your class to the IoC container and makes things difficult to test.

There are actually multiple ways you can use Service Locator:

// the MVC DependencyResolver can be used
DependencyResolver.Current.GetService<IService>();

// the Sitecore ServiceLocator can be used
using Sitecore.DependencyInjection;
ServiceLocator.ServiceProvider.GetService<IServiceCollection>();

Again don’t use these…unless you have no other choice.

Registering Dependencies

Of course an IoC container is useless if it has no registered dependencies to resolve! Sitecore’s container can be configured in multiple ways, all of which involve some level of XML. I heard you groan when you read that ;)

Keep in mind when wiring dependencies that the IoC container is not multitenant. Your dependencies are sharing the container with Sitecore’s - and if you have more than one site, potentially other sites as well. So don’t go expecting to have IFoo resolve to different implementations in different sites!

If you get confused and want to see a list of every dependency that is currently registered, along with its scope and type, there’s a page for that! Just visit /sitecore/admin/showservicesconfig.aspx and there you are. While you’re at it, check out the other handy tools in the admin pages too.

Configurators

A configurator is probably what you think of when you consider IoC configuration if you’ve been using any modern container library. It’s a C# class that conforms to an interface where you are given a container object, and expected to wire your dependencies to it. You can register as many configurators as you like in the <services> section.

<configuration xmlns:patch="http://www.sitecore.net/xmlconfig/">
    <sitecore>
        <services>
            <configurator type="MyProject.MyConfiguratorClass, MyProject" />
        </services>
    </sitecore>
</configuration>

Here’s an example configurator implementation that registers a couple dependencies. As with most containers Transient and Singleton dependencies are available, and I believe Scoped as well, but I’m not sure what the exact behaviour of that is in this case.

using Microsoft.Extensions.DependencyInjection;
using Sitecore.DependencyInjection;

namespace MyProject
{
    public class MyConfiguratorClass : IServicesConfigurator
    {
        public void Configure(IServiceCollection serviceCollection)
        {
            serviceCollection.AddSingleton<IDependency, Dependency>();
            serviceCollection.AddSingleton<IService>(provider => new Service("withFactory"));
        }
    }
}

Note: You cannot use Sitecore Factory conventions when registering configurators, for example setting properties on the configurator with child elements. This is because the Factory also speaks DI now as a fallback, so it’d be like asking the container to resolve itself :)

Direct Registration

You can also register individual dependencies with XML, just like we did ten years ago! I wouldn’t suggest doing this as it is less expressive than a configurator, not type-checked by compilation, and probably marginally slower as well due to having to convert the string to the type for every dependency.

<configuration xmlns:patch="http://www.sitecore.net/xmlconfig/">
    <sitecore>
        <services>
            <register 
                serviceType="Type.IName, Assembly" 
                implementationType="Type.Name, Assembly" 
                lifetime="Transient" />
        </services>
    </sitecore>
</configuration>

Automatic Controller Registration

If you’re actually reading this, you may have noticed that I mentioned earlier that you must register every MVC controller you wish to dependency inject with the IoC container. Sounds like a drag, right? Not so fast! Pull out your robe and wizard hat, grab this handy code, and register all your controllers automatically within a configurator:

public void Configure(IServiceCollection serviceCollection)
{
    // configurator per project? Use this:
    serviceCollection.AddMvcControllersInCurrentAssembly();

    // configure all the things from on high by convention? Use this (Habitat as the example):
    serviceCollection.AddMvcControllers(
        "Sitecore.Feature.*", 
        "Sitecore.*.Website");

    // you can also pass Assembly instances directly, but why?
    serviceCollection.AddMvcControllers(
        Assembly.FromName("Foo"), 
        Assembly.FromName("Bar"));
}

And without further ado, here’s the code that makes that possible.

Have a nice day!

Configuring domains from patch files

Sitecore domains are logical security groupings, for example the product ships with “sitecore” (backend users) and “extranet” (frontend users). But you do not have to stick with only the domains the product ships with, as usual for Sitecore you can extend and add your own.

Normally adding a domain means editing App_Config\Security\Domains.config, but we don’t want to do this. Why? Because editing standard Sitecore config files makes it difficult to upgrade Sitecore and introduces error prone file merging.

What we want to do instead is use config patch files. These allow us to add our config completely separately from Sitecore’s standard configuration files. But there’s a problem when it comes to domains: Domains.config does not live in the requisite <sitecore> config section so we cannot patch it.

Fortunately there’s a little known way around this. Someone at Sitecore implemented a config-based domain manager, but it’s not the default - presumably for backwards compatibility. And you can activate that, and add domains to it, using patch files.

So next time you want to add a domain to Sitecore, like say adding a domain for each site to provide logical author role groupings, switch over to the config domain manager. You know you want MySite\Editor instead of sitecore\MySite Editor. It’s easy to do, too.

This patch will activate the config domain manager (the defaults for the config manager already are the same as Domains.config so nothing else needs to be registered):

<configuration xmlns:patch="http://www.sitecore.net/xmlconfig/">
    <sitecore>
        <domainManager defaultProvider="file">
            <patch:attribute name="defaultProvider">config</patch:attribute>
        </domainManager>
    </sitecore>
</configuration>

And this patch is an example of adding a domain to the config domain manager:

<configuration xmlns:patch="http://www.sitecore.net/xmlconfig/">
    <sitecore>
        <domainManager>
            <domains>
                <domain id="MyNewDomain" type="Sitecore.Security.Domains.Domain, Sitecore.Kernel">
                    <param desc="name">$(id)</param>
                    <ensureAnonymousUser>false</ensureAnonymousUser>
                </domain>
            </domains>
        </domainManager>
    </sitecore>
</configuration>

And there you have it. Enjoy!

The Solr Cannon: Rapid Solr Setup for Sitecore

Have you ever wished that standing up a Solr server for Sitecore was easy? I have. So I made a script to make it so.

The Solr Cannon automates the setup and configuration of Solr on Windows (Note: Linux may be a better production choice if you have the option), including installation as a background service, Sitecore schema installation, core creation, and generating a Sitecore config patch file that will point Sitecore at your shiny new Solr server and its cores.

What you’ll need

  • A copy of the Bitnami Solr Stack for Windows (I used 5.5.0-1)
  • A copy of the script and the solr schema file (the schema was generated with Sitecore 8.1 Update 1, you might need to generate your own if it doesn’t work)
  • PowerShell 3.0 or later

Let’s do this

  • Copy the Solr stack and scripts to a folder on the server that will run Solr
  • Review the Install Solr.ps1 script to make sure the variables are to your liking (project name, ports, solr stack installer path, etc)
  • Open an administrative PowerShell prompt
  • Execute Install Solr.ps1
  • Kick back for a couple minutes
  • Bask in the glow of your new Solr server and all of its Sitecore cores

But what about the rest?

Ok ok, that’s not all you need to do in order to configure Solr and Sitecore.

  • Check out Patrick Perrone’s post to help you swap in Solr as the search provider and configure the Solr IoC container. Note: I’d recommend Windsor for the IoC. Autofac and Ninject were less than awesome install experiences…
  • Once you have the Sitecore configuration flipped to Solr, you can grab the Solr.config file that the Solr Cannon produced when it installed Solr (written to the script directory). This config patch will:
    • Point Sitecore at your Solr server
    • Make Sitecore look at the correct core names for each index
    • Enable SwitchOnRebuildSolrIndex which allows you to rebuild indexes without any index downtime (great for production…or dev)
  • Load up Sitecore, open the indexing manager, and rebuild all your indexes. With a bit of luck, you’ll be good to go!

Multi-tenant Solr

Suppose you’re working on your own machine and you’ve got more than one dev site that’s using Solr. The Solr Cannon scripts can act to create a new config set and cores for several Sitecore installations on the same Solr server. Edit the script to have a different $ProjectName set, run it again, and say no when asked if you need to install a Solr server. In this mode, the script will build out a config set and cores for a new Sitecore site, as well as the patch file.

Have fun :)

Branch Datasource Presets

Ever stored rendering component data source items under a page? For example:

/sitecore/content/Page
/sitecore/content/Page/Datasources/ComponentDataSourceItem

It’s a good practice and it seems to work quite well for page specific components. I use it all the time.

But have you ever wished branch templates understood that pattern in a logical fashion? What if this:

/sitecore/templates/branches/Foo/$name
/sitecore/templates/branches/Foo/$name/Datasources/ComponentDataSourceItem

…expanded out to have the branch create the hierarchy and re-link the layout details on the instiantiated branch item to point to the right relative child data source item, instead of the child item under the branch template?

Doing this lets you use branch templates to create preset rendering hierarchies, including page specific data source items.

Sound good? Well you’ve found the right place to get the code to do just that. This requires Sitecore 8 or above with the pipeline-based item provider to operate.

The Benchmark Show: Sitecore Precompilation

I’m mildly obsessed with Sitecore performance, so when I found a new trick I had to see what it could do: aspnet_compiler.exe. This is a really old tool that was designed to compile your .aspx pages into an assembly - and then later your cshtml as well. This improves startup time because no dynamic compilation needs to take place at runtime.

Getting aspnet_compiler to run against Sitecore, by which I mean executing it against an entire deployment ready web root including both your code and the sitecore folder, is a bit of a challenge. Because you cannot tell aspnet_compiler to ignore anything, and because one of the cshtml files in Sitecore 8.1 Update-1 apparently has a compiler error (for the curious, add @using Sitecore.ListManagement.Client.Web.UI.Controls.ImportMapTo to /sitecore/shell/client/Applications/ListManager/Controls/ContactFields/ContactFields.cshtml). You also have to comment out the @Html.Sitecore()s in /sitecore/shell/Templates/layout.cshtml (don’t worry it’s just a template used when you add a new MVC layout).

Once you get the fixes made, running aspnet_compiler is as simple as:

"c:\Windows\Microsoft.NET\Framework\v4.0.30319\aspnet_compiler.exe" -v / -p "c:\path\to\deploy\ready\files" "c:\output\path"

It will take a while - probably at least a minute - while it compiles every aspx and cshtml in the whole place into assemblies.

Cool trick. Does it work?

Let’s look at some hard data. I took my base Sitecore site (which runs Performance.config) and executed my deployment scripts over it, then precompiled that to a new folder with aspnet_compiler. Then I devised several tests to tease out both the effects of precompilation and whether Sitecore’s built in SPEAK precompilation has improved since its 8.0 days - where it could make startup take 140 seconds. The tests were in most cases run both with a cold ASP.NET Temporary Files folder (where .NET puts compiled Razor caches) and with a warm one for comparison. Cold would be the first startup on a new machine, whereas warm would be after an app pool recycle thereafter.

Test 1: Home Page

This is a simple test of loading the home page, which is a fairly simple Sitecore MVC layout with about 4 view and controller renderings and several partials. All tests begin with the app pool stopped and no w3wp executing.

Test 2: SPEAK Media Library Dialog

The SPEAK media browser (what you get when browsing from an image field, for example) has been historically a pain point performance wise. For this test I loaded the dialog iframe URL into a Chrome tab and measured the time to finish page load with the Chrome developer tools.

Results

Home Page (cold)

Baseline (Performance.config): 22.25s
SC Precompiler: 24.8s
Precompiled: 21.5s

As expected the precompiled is marginally fastest. Sitecore 8.1’s precompilation function, as we’ll see throughout the tests, seems to add 2-4 seconds to startup time. Without preexisting compiled temp files, startup is extremely slow in all cases - unexpectedly so for the supposedly ‘precompiled’ site. My guess is that it copies the precompiled files to the temp folder, which expends I/O, but that’s a guess.

Home Page (warm)

Baseline: 9.71s
SC Precompiler: 13.97s
Precompiled: 9.51s

With the temporary files warm, startup gets much faster. Once again the Sitecore precompiler is in last place.

SPEAK Media (cold)

Baseline: 29.6s
SC Precompiler: 33.8s
Precompiled: 22.93s

The effects of precompilation are strong when loading the very complex, partial-heavy SPEAK dialog - coming in 47% faster than the Sitecore default.

SPEAK Media (warm)

Baseline: 12.2s
SC Precompiler: 16s
Precompiled: 12.82s
SC Precompiler (warmed): 13.23s

Performance is nearly identical once the temporary compiled files are cached the first time for SPEAK. In this case there is also a test for having warmed the Sitecore precompiler and allowed it to finish precompiling in the background, then restarted the cold app pool.

Analysis (TL;DR)

Overall the effects of using aspnet_compiler prior to deployment are relatively minor in most real world cases. Initial startup is ideally a rare case, and once their caches are heated all options perform quite similarly (as an example, the second hit to the media dialog is ~250ms to finish). For more elastic deployments, such as cloud setups, or for larger clusters it is probably worth the effort since you burn the CPU cycles once and it does significantly improve first hit to SPEAK dialogs as well as marginal overall performance improvements. Rendering heavy Sitecore MVC implementations would also likely see similar gains to SPEAK. In addition to performance, using the aspnet_compiler validates the C# in your Razor views - which is a nice plus in the event of a Razor syntax error which would normally be discovered at runtime.

The big downside of precompiling is that it’s fairly slow (several minutes on fast hardware, probably much slower otherwise or without SSDs), and that it has to re-copy the whole web root to another output location (lots of I/O). So overall build time on CI may increase significantly.

Another option: Use the Sitecore precompiler

If you look at the results, startup time with the Sitecore precompiler is always a bit longer. But once the Sitecore precompiler completes its asynchronous run - usually within a couple minutes after startup - the results are very close to a natively precompiled site (see the warm media dialog results). This is overall a much simpler option. It does mean every instance has to compile for itself, but it does not require adaptation of the build process nor long times spent copying files.

And here’s the best part: you can use it for your own views, too. It’s just a Razor precompiler pipeline processor, and you can add one - or more - for your sites’ MVC views. For example:

<processor type="Sitecore.Pipelines.Initialize.PrecompileSpeakViews, Sitecore.Speak.Client">
    <Paths>/Areas/MySite/Views</Paths> <!-- virtual path to your views -->
</processor>

This will cause your views to all get precompiled asynchronously on startup - if they are not already - which writes their assemblies into the Temporary ASP.NET Files folder. So you trade a couple seconds of startup time, and an initial spike of CPU cycles, for consistent performance thereafter. However, you lose the protection against syntax errors provided by build-time precompilation.

Next time on the benchmark show: Common Sitecore development tasks, benchmarked on a variety of hardware.

Sitecore Azure Role Sizing Guide

It seems like everyone is hot to get Sitecore on Azure these days, but there’s not a whole lot of guidance out there on how Sitecore scales effectively in an Azure environment. Since I get asked the “what size instances do we need?” or “how much will Azure cost us?” question a lot, I figured some testing was in order.

The environment I tested in is a real actual customer website on Sitecore 7.2 Update-4 (not yet launched but in late beta). The site has been relatively optimized with normal practices - namely, appropriate application of output caching and in-memory object caching. The site scores a B on WebPageTest - due to things out of my control - and is in decent shape. We are deploying to Azure Cloud Services (PaaS), using custom PowerShell scripting - not the Sitecore Azure module (we have had suboptimal experiences with the module). We’re using SQL Azure as the database backend, and the Azure Cache session provider. Note that the Azure Cache session is not supported for xDB (7.5/8) scenarios.

The Tests

I wanted to determine the effects of changing various cloud scaling options relative to real world performance, but I also didn’t want to spend days benchmarking. So I settled on two test scenarios:

  • Frontend performance. This is a JMeter test that hits the site with 10,000 requests to the home page, with 1,000 threads at once. The idea is to beat the server into submission and see how it does.
  • Backend performance. I chose Lucene search index rebuilding, as that is a taxing process on both the database and server CPUs, and it conveniently reports how long it took to run. Note that you should probably be using Solr for any xDB scenarios or any search-heavy sites.

These are not supposed to be ‘end of story’ benchmarks. There are no doubt many bones to pick with them, and they’re certainly not comprehensive. But they do paint a decent picture of overall scaling potential.

Testing Environment

The base testing environment consists of an Azure Cloud Service running two A3 (4-core, 7.5GB RAM, HDDs) web roles. The databases (core, master, web, analytics) are SQL Azure S3 instances running on a SQL Azure v12 (latest) server.

Several role variants were tested:

  • 2x A3 roles, which are 4-cores with 7GB RAM and HDD local storage (~$268/mo each)
  • 2x D2 roles, which are 2-cores (D-series cores are ‘60% faster’ per Microsoft) 7GB RAM and SSD local storage (~$254/mo each)
  • 2x D3 roles, 4-cores 14GB RAM and SSD local storage (~$509/mo each)
  • 2x D4 roles, 8-cores 28GB RAM and SSD local storage (~$1018/mo each)

In addition, I tested the effect of changing the SQL Azure sizes on the backend with the D4 roles. I did not test the frontend in these cases, because that seemed to scale well on the S3s already.

  • S3 databases, which are 100DTU “standard” (~$150/mo each)
  • P1 databases, which are 125DTU “premium” (~$465/mo each)
  • P2 databases, which are 250DTU “premium” (~$930/mo each)

Results

Our first set of tests are comparing the size of the web roles in Azure. It is quite likely that these results would also be loosely applicable to IaaS virtual machine deployments as well.

Throughput

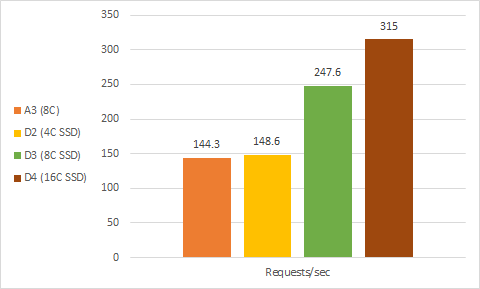
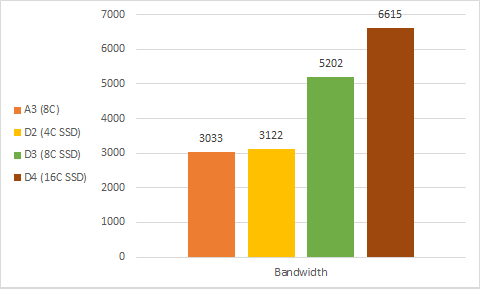
The throughput graph is about as expected: add more cores, get more scaling. The one surprise is that the D2 instance, with 4 total cores at a higher clock and SSD disk, is able to match the A3 with 8 total cores (D2 and A3 cost a similar amount).

Keep in mind that all of these were using the same SQL Azure S3 databases as the backend - for general frontend service, especially with output caching, Sitecore is extremely database-efficient and does not bottleneck on lower grade databases even with 16 cores serving.

Note that I strongly suspect the bandwidth between myself and Azure was the bottleneck on the D4 results, as I saw it burst up to more like 500 during the main portion of the test.

Latency

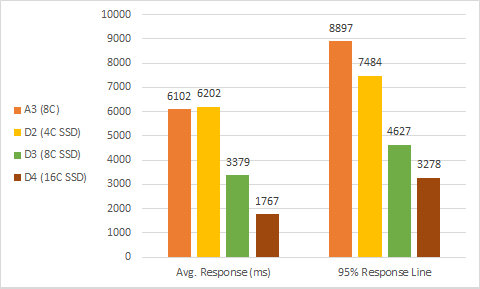
Latency continues the interesting battle between A3 and D2. The A3 pulls out a minor - within margin of error - victory on average but the SSD of the D2 gives it a convincing performance consistency win with the 95% line over 1 second faster. Given that A3 and D2 cost a similar amount, it seems D2 would be a good choice for budget conscious hosting - but if you can afford Sitecore, you should probably stretch your licenses to more cores per instance.

The D3 is probably the ideal general purpose choice for your web roles.

The latency numbers on the monstrous 8-core D4 instances tell the tale that my 1,000 threads and puny 100Mb/s bandwidth were just making the servers laugh.

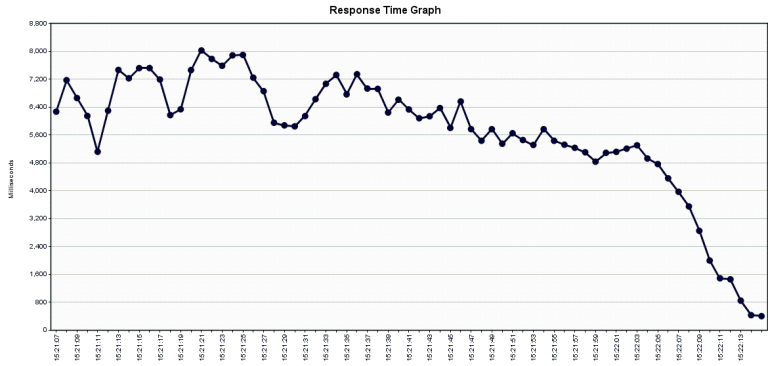
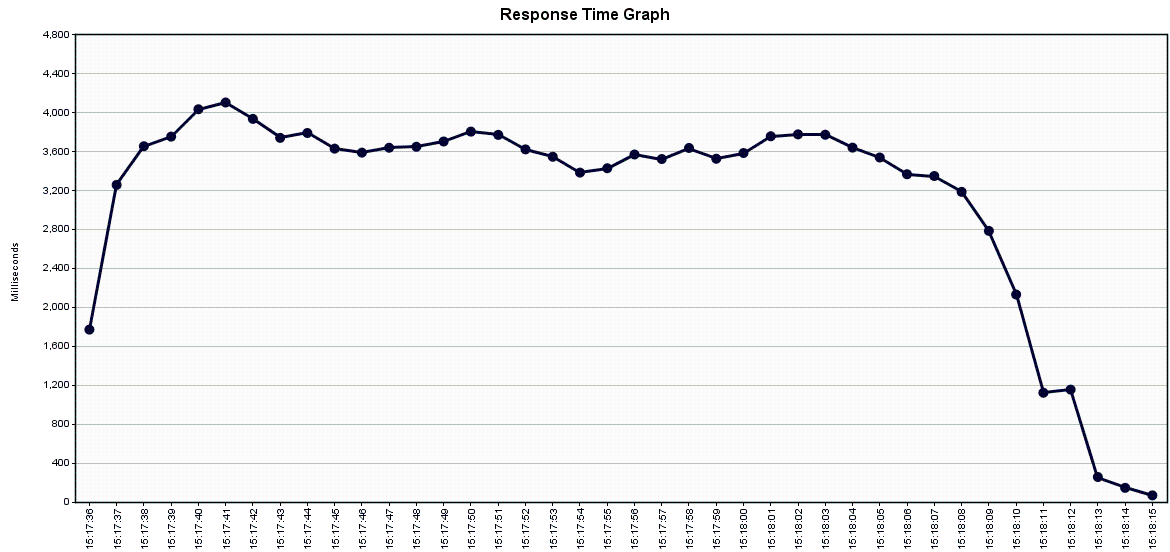
These graphs illustrate the latency consistency you gain from a D-series role with SSD:

These two graphs plot the latency over time during the JMeter test. You can see how the top one (A3) is much less consistent thanks to its HDDs, whereas the lower one (D3) is smoother, indicating fewer latency spikes. The latency decreases in the final stage of the test due to some JMeter threads having completed their 10-request run earlier than others, so less server load is in play.

Bandwidth

Bandwidth is another measure of how much data is being pushed out. Once again, the lesser gain than you might expect from D4 was due to my downstream connection becoming saturated as the monstrous servers laughed.

Backend: Rebuild all indexes

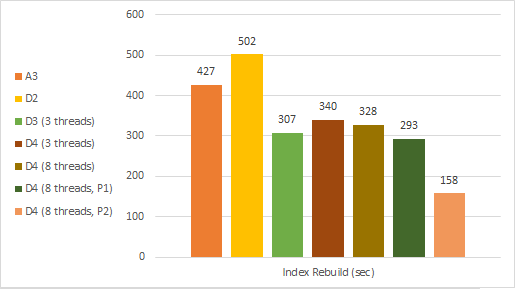
For this test, I rebuilt the default sitecore_core_index, sitecore_master_index, and sitecore_web_index indices.

Here we see the limitations of the S3 databases creep in during our D4 testing. Up to D3 seems to be limited by CPU speed, but the D4 is actually slower until we both up the max index rebuild parallelism and go to P2 databases to feed the monstrous 8-core beast.

Note that with SQL Azure, the charge is per-db - so if you wanted to kit out core, master, and web on P2s you’d be paying near $3,000/month just for the DBs. At that point it might be worth considering using IaaS SQL or looking at the Elastic Database Pools to spread around the bursty load of many databases.

Final Words

Overall Sitecore is a very CPU-intensive application where you can generally get away with saving a few bucks on the databases in favor of more compute, especially in content delivery. As in most applications, SSDs make a significant performance improvement to the point where I would suggest Azure D3 instances for nearly all normal Sitecore in Azure deployments, unless you need Real Ultimate Power from a D4 - or for the truly ridiculous a 16-core D14 ;)

For general frontend scaling the SQL Azure S3 seems to be the best price/performance until you go past quad cores, or past two web roles (one would assume 4x D3 would be relatively similar to 2x D4). Once you have 16 cores serving the frontend, you’ll be bottlenecked below P2 databases at least for index rebuilding. Publishing probably has similar characteristics.

As always when designing for scale, the first step should be to optimize your code and caching. For example, before I did any caching optimizations I did the same JMeter test on the site. The A3s only put out 40 requests/sec - after output caching and tweaks, they did 144 requests/sec. That’s not to say the site was slow pre-optimization: TTFB was about 220ms without load. But once you add load, even small optimizations make a huge difference.

Enabling Async in Sitecore Controller Renderings

IMPORTANT NOTE:

The information in this post unfortunately does NOT work for controller renderings as I had originally thought. It does, however enable you to use async actions outside of Sitecore contexts (e.g. in directly invoked controllers via non-Sitecore routes or Html.RenderAction() on a Sitecore rendering)

For the past few years, the rest of the .NET world outside Sitecore has been adopting the new async/await programming model that was introduced in .NET 4.5. This model essentially allows you to free up your worker thread while you’re waiting for something else to happen to continue exection. WTF does that mean?

Ok, so imagine you have a very simple web server that has 20 execution threads. This more or less means you can process 20 HTTP requests at the same time before you have to start queuing incoming requests - which kills performance.

Now suppose you’re making an expensive database call that takes 5 seconds on each request, and you get 40 requests at once. Without async, you have no choice but to send 20 requests into the queue. But with async, you can await the expensive database call - which frees up your execution thread(s) for someone else to use for actual processing while you wait for the database. So with an async database call and your 40 requests, you’d start processing 20 requests and rapidly start awaiting the database. This would enable the web server to start processing the other 20 queued requests instead of taking up execution threads that are doing nothing but wait! Then imagine if the latter 20 requests needed CPU time instead of database time - the web server CPUs would remain much more loaded over time and get more work done using the same resources.

Sounds good, right? But one of the down-sides of async is that you really need async calls from top to bottom to avoid deadlocks in ASP.NET. In other words, you could write your SQL API or REST client using async APIs all day - but unless the controller you invoke the APIs from is ALSO async, you’ll either get a deadlock or very little performance improvement. Unfortunately, Sitecore (as of 8.0 Update-2 anyway) does not support async controller actions. I didn’t like this, so I set out to fix that.

Ironically, the problem was very simple and rather hilarious. Sitecore MVC uses its own ControllerFactory which essentially wraps the default IControllerFactory from ASP.NET MVC and decorates it with some Sitecore-specific stuff. One of the things it does is look for the IActionInvoker on each controller, and if one exists wraps that implementation similarly with SitecoreActionInvoker to alter the way controller actions are invoked.

Looking around in the ASP.NET MVC source code, you can see that there are two interfaces for action invokers: IActionInvoker and IAsyncActionInvoker. Guess what? Sitecore’s ActionInvoker implements IActionInvoker but NOT IAsyncActionInvoker - which means that even though the default MVC action invoker it was wrapping supported async invocation, the wrapper’s lack of IAsyncActionInvoker implementation meant ASP.NET MVC wouldn’t use async invocation at all - and would instead throw an error that you cannot return a Task<ActionResult> from a synchronous controller. What?!

It’s a simple matter to patch Sitecore’s ControllerFactory, which is registered in the <initialize> pipeline:

<initialize>
    <processor type="Foo.Pipelines.Initialize.InitializeAsyncControllerFactory, Foo.Core" patch:instead="*[@type='Sitecore.Mvc.Pipelines.Loader.InitializeControllerFactory, Sitecore.Mvc']"/>
</initialize>

using Sitecore.Mvc.Controllers;
using Sitecore.Mvc.Pipelines.Loader;
using Sitecore.Pipelines;
using ControllerBuilder = System.Web.Mvc.ControllerBuilder;

The class to override the controller factory:

namespace Foo.Pipelines.Initialize
{
    /// <summary>
    /// Replaces the standard Sitecore MVC controller factory with one that knows how to do async action invocation.
    /// </summary>
    public class InitializeAsyncControllerFactory : InitializeControllerFactory
    {
        protected override void SetControllerFactory(PipelineArgs args)
        {
            SitecoreControllerFactory controllerFactory = new SitecoreAsyncControllerFactory(ControllerBuilder.Current.GetControllerFactory());
            ControllerBuilder.Current.SetControllerFactory(controllerFactory);
        }
    }
}

Then override the way the SitecoreControllerFactory patches the IActionInvoker on the controllers:

using System.Web.Mvc;
using System.Web.Mvc.Async;
using Sitecore.Mvc.Configuration;
using Sitecore.Mvc.Controllers;

namespace Foo
{
    /// <summary>
    /// Patches the normal Sitecore controller factory to enable executing async actions and using async/await
    /// The ActionInvoker that Sitecore MVC wraps the inner action invoker with does not implement IAsyncActionInvoker,
    /// which means ASP.NET MVC does not try to execute it async if needed, and precludes async/await.
    /// </summary>
    public class SitecoreAsyncControllerFactory : SitecoreControllerFactory
    {
        public SitecoreAsyncControllerFactory(IControllerFactory innerFactory) : base(innerFactory)
        {
        }

        protected override void PrepareController(IController controller, string controllerName)
        {
            if (!MvcSettings.DetailedErrorOnMissingAction)
            {
                return;
            }
            Controller controller2 = controller as Controller;
            if (controller2 == null)
            {
                return;
            }

            /* BEGIN PATCH FOR ASYNC INVOCATION (the rest of this method is stock) */
            IAsyncActionInvoker asyncInvoker = controller2.ActionInvoker as IAsyncActionInvoker;

            if (asyncInvoker != null)
            {
                controller2.ActionInvoker = new SitecoreAsyncActionInvoker(asyncInvoker, controllerName);
                return;
            }
            /* END PATCH FOR ASYNC INVOCATION */

            IActionInvoker actionInvoker = controller2.ActionInvoker;
            if (actionInvoker == null)
            {
                return;
            }
            controller2.ActionInvoker = new SitecoreActionInvoker(actionInvoker, controllerName);
        }
    }
}

And finally, implement an override of SitecoreActionInvoker which implements IAsyncActionInvoker:

using System;
using System.Web.Mvc;
using System.Web.Mvc.Async;
using Sitecore.Mvc.Controllers;

namespace Foo
{
    /// <summary>
    /// Literally all this does is provider an IAsyncActionInvoker wrapper the same way SitecoreActionInvoker wraps non-IAsyncActionInvokers
    /// This instructs ASP.NET MVC to perform async invocation for controller actions.
    /// </summary>
    public class SitecoreAsyncActionInvoker : SitecoreActionInvoker, IAsyncActionInvoker
    {
        private readonly IAsyncActionInvoker _innerInvoker;

        public SitecoreAsyncActionInvoker(IAsyncActionInvoker innerInvoker, string controllerName) : base(innerInvoker, controllerName)
        {
            _innerInvoker = innerInvoker;
        }

        public IAsyncResult BeginInvokeAction(ControllerContext controllerContext, string actionName, AsyncCallback callback, object state)
        {
            return _innerInvoker.BeginInvokeAction(controllerContext, actionName, callback, state);
        }

        public bool EndInvokeAction(IAsyncResult asyncResult)
        {
            return _innerInvoker.EndInvokeAction(asyncResult);
        }
    }
}

Then you can go forth and write lovely async controller renderings!

public async Task<ActionResult> AsyncActionMethod()
{
    // download a bunch of URLs in parallel with await
    var webClient = new WebClient();

    var urls = new[] {
        "https://google.com",
        "https://bing.com",
        "https://yahoo.com"
    }.Select(url => webClient.DownloadStringTaskAsync(url));

    var contents = await Task.WhenAll(urls);

    // or just await one task
    var google = await webClient.DownloadStringTaskAsync("https://google.com");

    // execution will pick up right here when all the awaited tasks are done - thawing the thread to finish execution

    return View(contents);
}

Have fun!

Extending Sitecore Rich Text Preview CSS

The other Sitecore Kam wrote an excellent post titled User Specific or Multi Site Specific CSS styles in Sitecore Rich Text Editor a few months ago. I noticed one gap in what it did, however: changing the RTE configuration does not change the preview of the rich text shown in the Sitecore content editor interface.

This means that you’d see the site specific styles when in the RTE proper, but not when browsing the item in the content editor.

So here’s how to accomplish just that. The RTE preview is rendered by the sitecore/shell/Controls/Rich Text Editor/Preview.aspx page. Being a normal Web Form page, we can hack its Inherits attribute to something else in order to inject our custom CSS:

<%@ Page ... Inherits="MyLibrary.MultisiteRichTextEditorPreview, MyLibraryAssembly" %>

Then we have to create a class which inherits the default codebehind class, Sitecore.Shell.Controls.RADEditor.Preview:

using System;
using System.Web.UI;
using Sitecore.Shell.Controls.RADEditor;

namespace MyLibrary
{
    public class MultisiteRichTextEditorPreview : Preview
    {
        protected override void OnLoad(EventArgs e)
        {
            base.OnLoad(e);

            // replace the method call here with whatever you're using to resolve a custom RTE CSS path(s)
            // note that the query string parameter 'id' is the context item ID here just like in the EditorConfiguration Kamruz blogged about.
            var stylesheetPath = MultisiteRichTextEditorUtility.GetRichTextEditorCssPath();

            if (stylesheetPath != null) Stylesheets.Controls.Add(new LiteralControl(string.Format("<link href=\"{0}\" rel=\"stylesheet\">", stylesheetPath)));
        }
    }
}

Finally, we need to ‘improve’ our RTE stylesheet (this is optional, but excellent!):

* {
    font-family: "Comic Sans MS" !important;
    color: pink !important;
}

And then we have our newly enhanced rich text preview: