The lazy developer's way to install Sitecore 9

Since Sitecore 9 was released, there’s been a lot of talk about the new installation techniques that it necessitates - namely, the move towards infrastructure as code and the Sitecore Install Framework (SIF). It’s no secret that installing Sitecore 9 can be a bit more difficult than previous versions, but it really doesn’t have to be.

This is the part where you might be expecting me to announce some crazy script I wrote, but not this time because someone else already did the work. So let’s address the elephant in the room.

Solr the easy way

Back in the day I wrote some scripts to install Solr using Bitnami. It worked, but I’d always wanted to find the time to make it simpler and less dependent on Bitnami and their notoriously hard to find older versions. Well Jeremy Davis did exactly what I wanted to do and scripted the whole Solr install, locally trusted SSL certificate, and installation as a service. You can also just skip straight to the gist of the PowerShell you need to run.

Seriously, it’s awesome and you should use it especially for local dev setups.

A few things I noted when I used it:

  • Change the download URLs for Solr and NSSM to be https (encrypted). They work fine that way.
  • You must install the Java Runtime Environment (JRE) first and plug in the right version - it won’t do it for you
  • Make sure to add the $SolrHost value to your hosts file before you run the script so that it can resolve with the SSL certificate correctly (it will be bound to that name; don’t use localhost).

SIF the easy way with SIFless

SIF is a pretty amazing tool, but it has two shortcomings: one, that it’s great for automated infrastructure but not so great for a quick local setup and two, that it doesn’t yet have an uninstall feature. Well Rob Ahnemann wrote a handy GUI for SIF called SIFless that fixes both of those issues, making quick setups with mostly default settings easy and generating hackable SIF PowerShell scripts that let you do whatever advanced things you want after using the GUI to get started. And it generates uninstall scripts too that get rid of the windows services, solr cores, and other artifacts that are left when you want to tear down that test site.

A few things to be aware of with SIFless:

  • Despite the amusing name, SIFless does require SIF to be installed!
  • The Solr URL needs to be the path to the Solr admin panel (e.g. not https://mysolr:8983, but https://mysolr:8983/solr)
  • The Solr physical path needs to be to the root of the Solr instance (if it’s the right place you’ll see ‘bin’ and ‘server’ folders; if you used the script above with defaults this would be C:\solr\solr-6.6.2)

Go forth and use Sitecore 9

Using these two tools I went from having no Solr and no Sitecore installations to having a fully operational battle station Sitecore 9 instance with xConnect in about 45 minutes. And that includes debugging my own silly mistakes. I bet you can do it faster. Get thee to a PowerShell console!

time to get SIFty

I'm a Sitecorian!

I am excited to announce that I am joining the Sitecore product team as a Platform Architect!

wth

Now normally this wouldn’t merit a whole blog post, and we’d just let the recruiters find out about it on LinkedIn. But I’m sure many folks’ next question would be around all the libraries that I maintain and what will happen to them. So let’s address the elephant in the room:

not a thing

Unicorn, Rainbow, and Dianoga

These will continue exactly as they are today as independent, community driven projects. I will still be the maintainer. The license will remain MIT.

This also includes the dependency libraries that these projects use (e.g. Configy, WebConsole, MicroCHAP).

Synthesis & Leprechaun

Ok hold up: let’s first define what Leprechaun is because I haven’t publicly spoken about it yet. It’s a stable command-line code generator that works from Rainbow serialized items. Kinda like the T4 templates that a lot of people use except that it’s better because:

  • Uses Roslyn and C# Scripting, so it can run outside Visual Studio (e.g. on a CI server)
  • Ridiculously faster than T4
  • Has a watch mode that provides instant regeneration when saving templates in Sitecore
  • Uses the same configuration system as Unicorn does, so it’s familiar and simple to configure

Leprechaun is currently working in production on a couple sites, but does not have complete documentation so it may require a bit more spelunking to use. Currently it supports Synthesis out of the box, but it’s easy to add or change code generation templates.

Ok back to what’s happening to these projects. For the last year or so it’s been difficult to come up with the time and inclination to give Synthesis and Leprechaun the love they deserve. In order to get them that love, I am ceding maintainership to the excellent Ben Lipson. Ben is talented developer and Sitecore MVP with a lot of good ideas about where to take these tools. He’ll do a great job.

Aside from transferring the repositories to Ben, nothing else is changing.

Will you be disappearing from the community?

nope

No. #venting 4lyfe.

What will you be working on at Sitecore?

I’ll be on Team X, led by the illustrious Alex Shyba. In other words, if I told you I’d have to kill you.

actually it's JSS

/giphy #magic8ball "Will this be awesome?"

yes

Quickly add SSL to Solr

There have been several people recently who I’ve seen having trouble setting up SSL for their Solr in order to use it with Sitecore 9. So, I present the following gist to you. It’s designed to automate the complete setup process of adding SSL to Solr with a self-signed certificate, and trusting that self-signed certificate. For production setups with a real certificate, it should be quite easy to modify.

It’s been tested on standalone as well as Bitnami Solr. The script requires Windows 10 to use the Import-PfxCertificate cmdlet; if you don’t have that you can remove the trust scripting and do it manually.

giphy

All about xConnect Security

Sitecore 9 introduces the new xConnect server to the ecosystem. xConnect is an abstracted service layer that Sitecore uses for all its analytics and marketing automation features. If you’re using Sitecore XP (aka xDB), you’ll need an xConnect server if you upgrade to Sitecore 9.

xConnect is noteworthy because it introduces client certificate authentication for the Sitecore XP server to communicate with xConnect. Certificates are a complex subject, and can fail in any number of less than helpful ways. This post aims to help you understand how certificates work in Sitecore 9, and provide you some tools to diagnose what’s wrong when they are not working right.

What is TLS?

In order to understand how xConnect works, it’s important to understand what’s going on: Transport Layer Security (TLS). You may also think of this as “SSL” or “HTTPS.”

TLS is a protocol for establishing secure encrypted connections between a server and a client. The key aspect of TLS is that the client and server can securely exchange encryption keys in such a way that they cannot be observed by malicious parties that may be watching the exchange.

Asymmetric vs Symmetric Encryption

To understand how TLS works, it’s important to understand the distinction between Asymmetric (also called Public Key) Encryption, and Symmetric Encryption.

If you ever made secret codes as a kid, you’ve probably used symmetric encryption. This is where the sender and receiver both need to know a key to decrypt the message, for example a simple shift cipher where D = A, E = B, and so forth. Julius Caesar famously sent secret messages by shifting letters three places forward like this. Symmetric encryption does have one major downfall, however: posession of the secret key lets you read any encrypted message even if not the intended recipient.

Asymmetric encryption on the other hand uses two different keys: a public key and a private key. The public key can be shared with anyone without compromising anything. However a client can use the public key to encrypt a message in such a way that it can only be decrypted with the server’s private key. In this way, you can receive private encrypted messages from clients you don’t share any secrets with - but they can still send the server private messages.

TLS uses asymmetric encryption to transfer an encryption key for symmetric encryption, which is used for ongoing data transfer over the encrypted connection. This is done because asymmetric encryption is much much slower than symmetric.

It’s important to understand the difference between public and private keys when you set up Sitecore 9, because they need to be deployed to different servers in your infrastructure. A certificate generally includes both a public and private key, however it can also include only a public key.

xConnect Setup

xConnect uses mutual authentication to secure the connections between it and the Sitecore XP server. This is accomplished using TLS client certificates.

If you’ve worked with SSL certificates before, this is a stronger form of SSL where not only does the client have to trust the server, but the server also has to trust a second certificate issued to the client. In this case, the client is the Sitecore XP server, and the server is the xConnect server. Let’s take a look at how this works:

SSL Server Certificate Negotiation

All SSL connections go through this process, whether xConnect or otherwise. In a standard Sitecore 9 XP installation, the xConnect server will have the server certificate installed. The Sitecore XP server will only have a server certificate if access to Sitecore itself, e.g. for administration, is done via SSL (in which case it will likely be a separate server certificate from xConnect’s).

  1. Client prepares to make a HTTPS request (e.g. you ask for https://xconnect)
  2. Client sends a ClientHello message to the server. This proposes encryption standards, among other things.
  3. The server replies with a ServerHello message back to the client. This includes the server’s public key, and the encryption standards that the server has selected from what the client proposed in the ClientHello.
  4. The client validates the server certificate (e.g. must have correct domain and trusted issuer)
  5. A symmetric encryption key is generated and exchanged using the server’s public key
  6. Now that an encrypted connection is established, a normal HTTP request is sent over the encrypted channel

What can go wrong with server certificate negotiation

The most common issues are domain mismatches and untrusted certificates. Generally you can diagnose issues with server certificates using a web browser - request the site over HTTPS and review the error shown in the browser. Make sure you request the xConnect server URL, not the Sitecore XP URL if you are diagnosing an xConnect connectivity issue.

Domain Mismatches

A domain mismatch occurs when a certificate’s domain does not match the domain being requested. For example, a certificate issued to sitecore.net will fail this validation if the site you’re requesting is https://foo.local. Certificates may also be issued using wildcards (e.g. *.sitecore.net). Note that wildcards apply to one level of subdomains only - so in the previous example sitecore.net or foo.sitecore.net would be valid, but bar.foo.sitecore.net would not be.

Domain matching is done based on the host header the server receives. For example if the xConnect server is https://xconnect but can also be accessed via https://127.0.0.1, the certificate will be invalid if the IP address is used because the certificate was not issued for 127.0.0.1.

If you have a domain mismatch issue, you will need to either get a new certificate (and update the xConnect IIS site(s) to use the new certificate) or change the domain for xConnect to one that is valid for the certificate.

Untrusted Certificates

To understand trust issues, it’s important to understand how certificates are issued. Certificates are issued by other certificates.

In fact, certificates can be issued in chains (Xzibit would definitely approve). Trust issues occur when the certificate that issued the server certificate is not considered to be trusted by the client. On Windows, trust is established by being included in the Trusted Root Certification Authorities in the machine certificates:

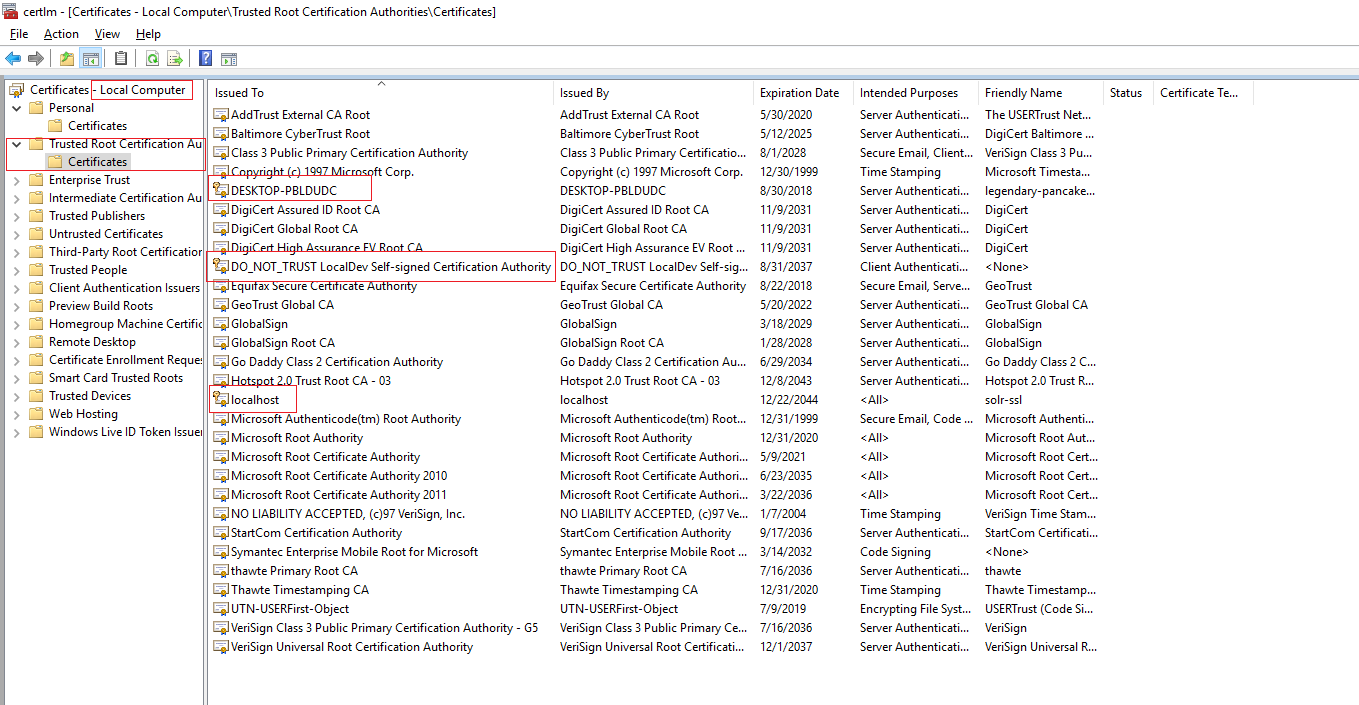
Note that to trust a certificate, only the public key for the server certificate must be imported here. If you’re using self-signed certificates that issued themselves - like localhost in the screenshot - you can add the certificate itself to the trusted root certificates by exporting it and reimporting it into the root certificates. If using a commercially issued certificate, that certification authority’s root certificates must be added to the trusted root - in most cases, they are already present.

More esoteric errors

There are some less common issues that can also cause server certificate negotiation errors. Servers will be commonly secured against supporting vulnerable ciphers, hash algorithms or SSL protocol versions. You might have heard of Heartbleed or POODLE vulnerabilities, or had to support TLS 1.2 if working with some web APIs such as SalesForce. This is a good idea, but if the server and client cannot mutually agree on a supported cipher, hash, and protocol version the connection will fail. If the certificate is trusted and has the correct domain, this would be the next thing to check.

If you’ve never heard of this before, you can secure your IIS servers using a tool like IISCrypto. Go do it now, this post will wait.

Note that the .NET HTTP client with framework versions prior to 4.6.2 defaults to only supporting TLS up to 1.1. Many modern security scripts will disable all TLS protocol versions except for 1.2, which will cause HTTP requests from clients with earlier versions of the .NET framework installed to fail.

SSL Client Certificate Negotiation

Hopefully now you have a decent idea of how server certificates work. But xConnect also uses client certificates. A client certificate enables mutual authentication. With only a server certificate, the client must decide to trust the server but the server has no way to know if it should trust the client. Enter client certificates.

A client certificate is essentially the opposite of the server certificate. When using a client certificate, the negotiation works similarly to the server certificate, except that when the server sends the ServerHello (#3 above) it requests a client certificate in addition to sending its public key. The client then sends the public key of its client certificate back to the server - and then the server decides whether it should trust the client certificate.

If the client certificate is not trusted, it is rejected. The rules for validating a client certificate are up to the server and do not necessarily follow the same validation rules as a server certificate on the client. In the case of xConnect:

  • The domain/subject on the client certificate does not seem to matter to xConnect
  • The trusting of the certificate is done using the thumbprint of the certificate (a hash of the certficate which uniquely identifies it). Note that the thumbprint will change when an expired certificate is renewed, so you will need to reconfigure xConnect after renewing a client certificate so that it trusts the newer thumbprint.
  • The xConnect server must trust the issuer of the client certificate

What can go wrong with client certificate negotiation

There are a lot of things that can go wrong with the client certificate, moreso than the server certificate. When troubleshooting, make your first step the Sitecore XP logs - they generally have some basic information about a bad client cert.

If you’re receiving HTTP 4xx responses

Chances are your client certificate validation failed. This could mean:

  • The client certificate is not installed on both the Sitecore XP server and the xConnect server (the xConnect server would only need the public key)
  • The client certificate is not considered trusted on the xConnect server
  • The certificate thumbprint configured in the xConnect server’s App_Config\ConnectionStrings.config is missing or incorrect. Note that the thumbprint must be all uppercase with no spaces or colons. If copied from certificate manager, an unprintable character might prefix the thumbprint - check for a hidden character there.
  • The certificate location configured in the xConnect server’s App_Config\ConnectionStrings.config is incorrect. Normally the certificate should be stored in local machine certificates and have a connection string similar to StoreName=My;StoreLocation=LocalMachine;FindType=FindByThumbprint;FindValue=THUMBPRINTVALUE.

“The certificate was not found”

This indicates one of two things:

  • The thumbprint is incorrect in the Sitecore XP server’s App_Config\ConnectionStrings.config file. Note that the thumbprint must be all uppercase with no spaces or colons. If copied from certificate manager, an unprintable character might prefix the thumbprint - check for a hidden character there.
  • The certificate location configured in the Sitecore XP server’s App_Config\ConnectionStrings.config is incorrect. Normally the certificate should be stored in local machine certificates and have a connection string similar to StoreName=My;StoreLocation=LocalMachine;FindType=FindByThumbprint;FindValue=THUMBPRINTVALUE.

System.Net.WebException: The request was aborted: Could not create SSL/TLS secure channel.

As long as the server certificate is valid, this message is most likely that the Sitecore XP server’s IIS app pool user account does not have read access to the client certificate’s private key. This access is needed so that the Sitecore XP server can encrypt communications using its client certificate.

To remedy this issue, open the local machine certificates (“Manage computer certificates” in a start menu search) on the Sitecore XP server. Find the client certificate (normally under Personal\Certificates). Right click it, choose All Tasks, then Manage Private Keys.... You should get a security assignment window like this:

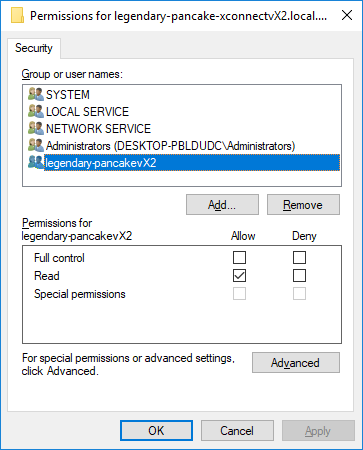
Next, add your IIS app pool user to the ACLs and grant it Read permissions (as above). Remember if you’re using AppPoolIdentity (you should be, unless using a domain account for windows auth to SQL), you must select the account by choosing Local Computer as the search location, and enter IIS APPPOOL\MyAppPoolsName as the account name to find.

Still having issues? Well, you can also use the security audit log to find out which account is failing to get access, then add that account in the key ACLs above:

Local Development Tip

If you work at a Sitecore partner and will have multiple copies of Sitecore 9 running locally, this can cause issues if you issue a dedicated SSL server certificate to each site. This is because a given TCP port (e.g. 443, the default) can only have one SSL certificate bound to it. This precludes having multiple Sitecore 9 instances running together locally unless they share the same SSL certificate.

Wildcard certificates are perfect for this job. As long as you use the same top level suffix for all your dev sites (e.g. *.local.dev), you can use the same wildcard certificate for your server certificate for all dev sites. Note that IIS’ self-signed certificate generator will not create a wildcard certificate for you. You’ll have to use something else, like New-SelfSignedCertificate, to create one.

Important note: You must issue a wildcard for at least two segments of domain for it to be trusted. For example *.dev is bad, but *.local.dev is good.

Note that client certificates should be unique on each site, only the server certificate should be shared.

In the release version of Sitecore 9, you can also disable the requirement to use encryption with xConnect which can bypass a lot of debugging. Do not do this in production or else a herd of elephants will destroy you.

Advanced Debugging with Wireshark

It’s possible to watch the SSL negotiation at a TCP/IP level using a network monitor such as Wireshark. This can provide insights on why your setup is failing when error messages are less than optimal. For example I spent a couple days diagnosing what turned out to be private key security issues. I figured this out by using Wireshark and observing that the client was never sending its client certificate after the server requested it, and figuring out why that was.

To use Wireshark to watch SSL traffic, you’ll have to set it up to decrypt traffic. This guide walks you through setting up decryption on Windows with an exported private key.

If you’re tracing local dev traffic (e.g. from localhost to localhost, including using your machine’s DNS name) Wireshark will not capture that unless you install npcap instead of the default pcap packet capture software. Once npcap is installed, tell Wireshark to bind to the Npcap Loopback Adapter to see local traffic.

Here is a screenshot of the Wireshark capture where I diagnosed the client certificate security issue:
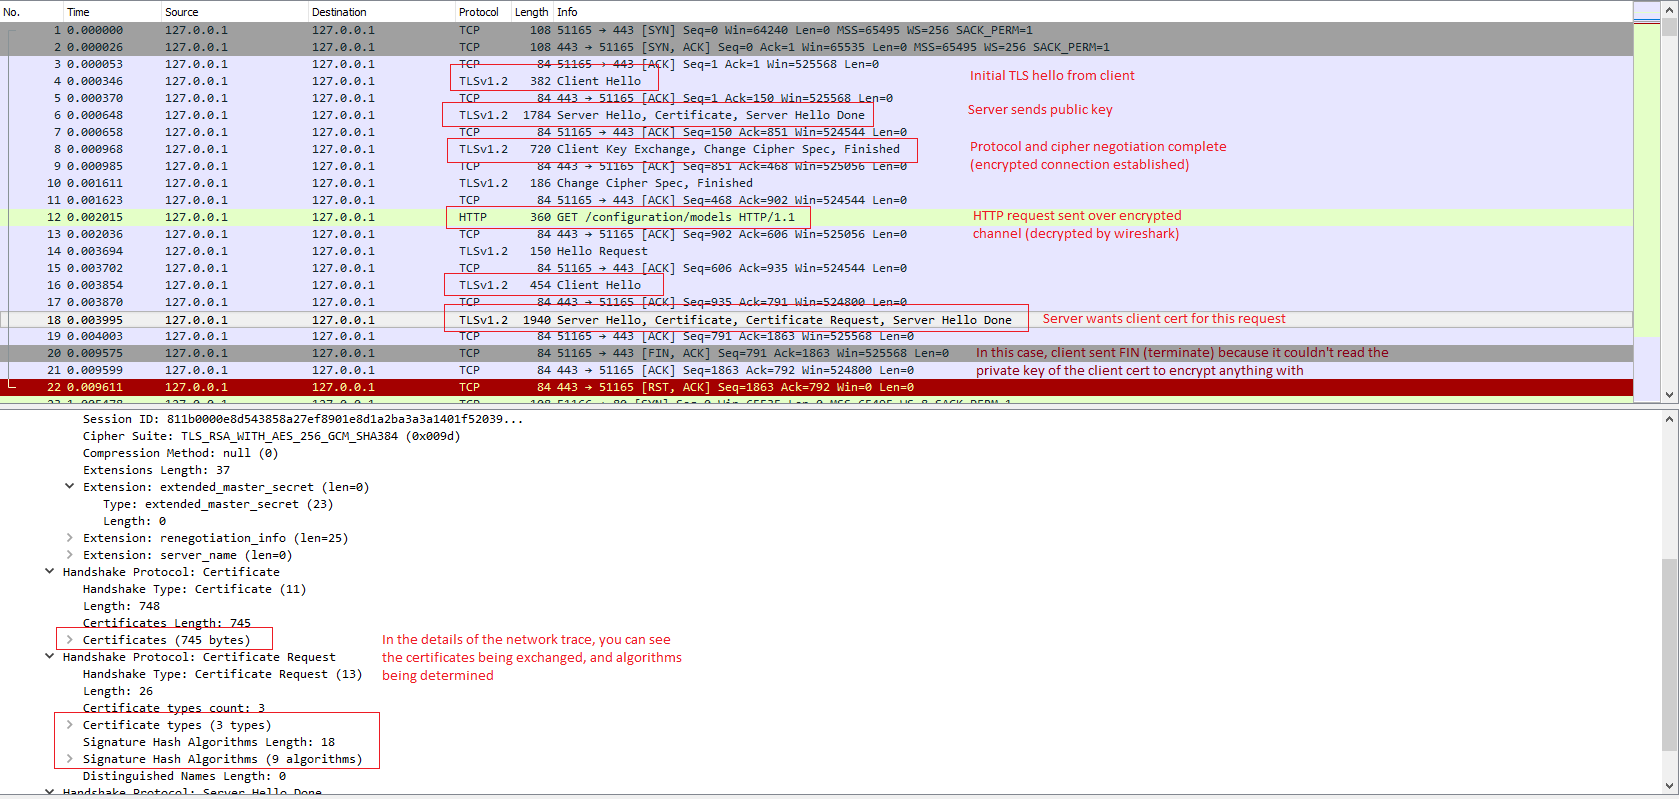
Good luck!

Where to find Sitecore documentation

The land of Sitecore documentation is becoming a bit crowded these days. While at Symposium, I heard some people say they didn’t know how to keep up on new documentation - so here’s what I know. No doubt I missed some resources too, but these are the ones I usually use and follow.

Official Docs

Sitecore Doc Site

This is the main place to find documentation for Sitecore, as well as Sitecore modules. It has a handy RSS feed of updated articles you should subscribe to.

Unfortunately the RSS feed is not entirely complete due to documentation microsites being proxied in under the main doc site (for example Commerce and the v9 Scaling Guide). These statically generated sites generally do not provide their own RSS feeds, and are thus harder to track updates to.

Sitecore Knowledge Base

The Sitecore KB lists known issues, support resolutions, security bulletins, and other support information. Like the main doc site, it has its own RSS feed of updated articles that is absolutely worth subscribing to.

Sitecore Helix Docs

Sitecore’s official architecture guidance has its own website. Unfortunately, no RSS feed of updates.

Sitecore JSS Docs

The JavaScript Services module has its own separate documentation site. Unfortunately, no RSS feed of updates.

Sitecore Dev Site

Where to go to actually download Sitecore releases and official modules such as SXA and PXM. There’s no RSS feed of new releases and updates, unfortunately.

Community-run Docs

Sitecore Blog Feed

A Sitecore-run blog aggregator that serves up a fresh helping of most major Sitecore blogs. Worth subscribing to via its RSS feed.

Sitecore StackExchange

A community-driven Q&A site that’s part of StackExchange. If you have a question about Sitecore, there are many highly active members who are happy to help here.

Sitecore Slack

Slack is a group messaging/discussion tool. The Sitecore Community Slack group has over 2,700 Sitecore developers with very active participation. If you do Sitecore, you should be here.

Unofficial Sitecore Training

Community run unofficial training videos that cover development practices that are commonly used, but not covered in official Sitecore training. More opinionated, influenced heavily by real-world implementation experiences.

Sitecore Community Docs

Unofficial documentation. Not updated that often any longer but still some good information, especially the article on config patching.

Sitecore Powershell Extensions Docs

The SPE documentation is so complete that it’s worth mentioning even though it’s for a single Sitecore module.

Simplifying Contact Facets with C# 6

Contact Facets allow you to persist information about visitors into the Sitecore xDB. We’re not going to get into the theory behind them in this post; for that go read Pete Navarra’s great blog post that summarizes current practices and how to add facets.

Today we’re going to discuss how to syntactically improve the declaration of a contact facet class using syntaxes available in C# 6.0 (VS 2015) and C# 7.0 (VS 2017). It’s important to note that the C# version is decoupled from the .NET framework version: the C# 7.0 compiler is perfectly capable of emitting C# 7 syntax to a .NET 4.5-targeted assembly, for instance. So you can use these modern language features as long as you’ve got the right version of MSBuild or Visual Studio :)

Here’s the example Pete uses in his post, which follows other examples out there as well:

1
2
3
4
5
6
7
8
9
10
11
12
13
14
15
16
17
18
19
20
21
22
23
24
25
26
27
28
29
30
31
32
33
using System;
using Sitecore.Analytics.Model.Framework;

namespace SitecoreHacker.Sandbox.Facets
{
[Serializable]
public class MarketingData: Facet, IMarketingData
{

private const string CUSTOMER_ID = "CustomerId";
private const string SEGEMENT = "Segment"; // sic :p

#region Properties
public string CustomerId
{
get { return GetAttribute<string>(CUSTOMER_ID); }
set { SetAttribute(CUSTOMER_ID, value); }
}

public string Segment
{
get { return GetAttribute<string>(SEGEMENT); }
set { SetAttribute(SEGEMENT, value); }
}
#endregion

public MarketingData()
{
EnsureAttribute<string>(CUSTOMER_ID);
EnsureAttribute<string>(SEGEMENT);
}
}
}

As you can see, the facet API requires string keys for the facet values - in this case stored as const string - to get and set them. Further, as Pete notes:

I found out the hard way that the constants defined, the value must equal the actual name of the class property for the same attribute.

Well in C# 6 (VS 2015), there’s a syntax for that. The nameof statement allows you to get the string name of a variable or property. This essentially hands off the management and maintenance of the const value to the compiler, instead of the developer.

So we can clean up this example by using nameof instead of constants - and get as a bonus refactoring support and compile-time validation of the names:

1
2
3
4
5
6
7
8
9
10
11
12
13
14
15
16
17
18
19
20
21
22
23
24
25
26
27
using System;
using Sitecore.Analytics.Model.Framework;

namespace Elephant.Sandbox.Facets
{
[Serializable]
public class MarketingData: Facet, IMarketingData
{
public string CustomerId
{
get { return GetAttribute<string>(nameof(CustomerId)); }
set { SetAttribute(nameof(CustomerId), value); }
}

public string Segment
{
get { return GetAttribute<string>(nameof(Segment)); }
set { SetAttribute(nameof(Segment), value); }
}

public MarketingData()
{
EnsureAttribute<string>(nameof(CustomerId));
EnsureAttribute<string>(nameof(Segment));
}
}
}

Finally if you have C# 7.0 (VS 2017), you can also utilize expression bodied members to further clean up the property syntax:

1
2
3
4
5
6
7
8
9
10
11
12
13
14
15
16
17
18
19
20
21
22
23
24
25
26
27
28
29
using System;
using Sitecore.Analytics.Model.Framework;

namespace Rhino.Sandbox.Facets
{
[Serializable]
public class MarketingData: Facet, IMarketingData
{
public string CustomerId
{
// expression bodied members turn the single-expression get
// into a lamdba-style syntax, removing the need for braces
get => GetAttribute<string>(nameof(CustomerId));
set => SetAttribute(nameof(CustomerId), value);
}

public string Segment
{
get => GetAttribute<string>(nameof(Segment));
set => SetAttribute(nameof(Segment), value);
}

public MarketingData()
{
EnsureAttribute<string>(nameof(CustomerId));
EnsureAttribute<string>(nameof(Segment));
}
}
}

So there - now go forth and put your data in the xDB :)

Controlling Rendering Order in Sitecore MVC

Back in the bad old Web Forms days, rendering a page was a multi-step process. There were Init, Load, PreRender, and Render, just to name a few. This was mostly a pain to deal with as it made it hard to know when in the page lifecycle you should place your code to deal with framework side effects. It also made its fair share of inane interview questions.

But it did mean one useful thing: there was a place you could put code where it would always run even if a rendering was output cached, that went before the page actually rendered. Why was this useful? Suppose you needed a certain CSS class on <body> when a specific rendering was added to the page. Maybe a rendering would override the <title>, or any number of other techniques* which require code to execute prior to page layout composition.

* most of these techniques are just as bad as Web Forms :P

When MVC became popular, it brought its own single-step rendering pipeline. This is awesome because it’s easy to understand: the page rendering starts at the top and works its way down, rendering partials and the like in order. No more “the form value is missing because you added the dynamic field after init so data binding had already run.” (Seriously?) Simple.

But in a single step pipeline, there’s no room for a later component to signal an earlier component anything. Take this for example:

// support class
public class Body
{
    public static string CssClass { get; set; }
}

// layout
<body class="@Body.CssClass">
    @Html.Sitecore().Placeholder("wrapper")
</body>

// inside wrapper, in a controller
public ActionResult Rendering()
{
    Body.CssClass = "🐘";
    return View();
}

What will happen? Well, first the body tag will execute, then the wrapper placeholder will be executed. The body class will be set after the <body> tag has been rendered: there will be no class on the body.

There are two ways I know of to get around this.

Use a Layout

A layout? Aren’t we already using one of those? Nope: an MVC layout, not a Sitecore layout. In our example above, we could refactor the layout like this:

// _Layout.cshtml
<body class="@Body.CssClass">
    @RenderBody()
</body> 

// SitecoreLayout.cshtml
@{
    Layout = "~/Path/To/_Layout.cshtml";
}

// the body of this is placed in the @RenderBody() in the MVC layout
@Html.Sitecore().Placeholder("wrapper")

Here the Sitecore layout inherits the MVC layout by setting the Layout property. This also has the side effect that the Sitecore view is executed before the MVC layout. So in our example, now the SitecoreLayout.cshtml is rendered (including the rendering which sets the body class), and then the _Layout.cshtml renders and places the Sitecore content in the @RenderBody(). The body class is thus set how we want.

MVC layouts are also a lovely tool if you have several Sitecore layouts which share a lot of common boilerplate wrapper code - for example, the same meta tags, favicon, or version footer - without duplicating them several times. Sections enable you to have your Sitecore layout also write to specific places in the MVC layout. For example you might choose to expose a head section to enable the Sitecore layout to add CSS files or analytics scripts to the MVC layout <head>.

Reversed Rendering

The second way to control your renderings’ order is to use a technique I call Reversed Rendering. This is a simple trick that relies on the fact that HTML helpers are really just functions. This is a completely valid layout:

@{
    var wrapper = Html.Sitecore().Placeholder("wrapper");
}

<body class="@Body.CssClass">
    @wrapper
</body>

The Placeholder() method returns a HtmlString object, which contains the markup for the placeholder. You can take advantage of this to change the order by assigning the placeholder to a variable instead of rendering it directly into the output. Then you can control the order in which things render to make the body content render before the parent tags, thus facilitating communications.

I haven’t tried it (and performance wouldn’t be great dealing with large strings), but you could also theoretically use this trick to perform HTML post-processing on rendered renderings.

What about output caching?

Output caching gains performance by not executing the whole rendering pipeline and instead serving a pre-cached static version or a rendering. The problem is that by bypassing the rendering pipeline it also bypasses the code (controller or view) that pushes data up to the layout.

So when using these techniques, make sure to not enable output caching on any renderings that are setting variables used in the layout - or else the variables won’t be set as soon as the caching kicks in.

So there you have it. Go forth and have fun!

EditContext Considered Harmful

If you’ve worked with Sitecore for very long, you have probably needed to update an item’s content programmatically. A pattern in common usage for this is to use the EditContext class, for example:

Item item;
using(new EditContext(item))
{
    item["FieldName"] = "A new value";
}

Unfortunately, it has a fatal flaw. A fatal flaw that Jakob Christensen pointed out in 2006. Unfortunately it’s still in wide use, and is not marked as obsolete. Hopefully this post can help change that!

The problem lies in the way the using statement works. It is effectively equivalent to this:

var context = new EditContext(item);
try
{
    item["FieldName"] = "A new value";
}
finally
{
    context.Dispose();
}

An astute observer will notice that due to the finally semantic, the EditContext is always disposed, regardless of whether an exception occurs. Take this code for example:

Item item;
using(new EditContext(item))
{
    item["FieldA"] = "Sample";
    item["FieldB"] = GetFieldValue();
    item["FieldC"] = "A new value";
}

public string GetFieldValue() 
{
    throw new ArgumentException("Let's address the elephant in the room.");
}

In this example GetFieldValue() throws an exception. This will cause an immediate drop through to the finally of the using statement, which executes whether an exception is thrown or not. Which will commit the partial item change to FieldA without FieldB or FieldC, leaving the Sitecore item in an inconsistent state. Which you probably do not want.

So what should we use?

The correct way to edit an item is with the Editing property, for example:

Item item;
item.Editing.BeginEdit();
item["FieldA"] = "Sample";
item["FieldB"] = GetFieldValue();
item["FieldC"] = "A new value";
item.Editing.EndEdit();

Note how EndEdit() will not be called if an exception occurs. This prevents Sitecore from writing any field changes to the database (changes are queued up and committed all together when EndEdit() is called).

This syntax is however a bit hard to read, because it is difficult to parse the code compared to the neat indentation of EditContext. I would like to propose an alternative syntax, taking advantage of the fact that you can use arbitrary braces in C#:

Item item;

item.Editing.BeginEdit();
{
    item["FieldA"] = "Sample";
    item["FieldB"] = GetFieldValue();
    item["FieldC"] = "A new value";
}
item.Editing.EndEdit();

There! Now it reads nearly like EditContext, but does not suffer from its downsides :)

Become a Sitecore admin without a login

Suppose someone sends you a Sitecore solution to review, and they forgot to send you a username and password. You could ask for one, or you could just make yourself an account with this handy trick that I call “The Shiv.” This is the entirety of the trick:

  1. Create a Shiv.aspx file somewhere under the webroot. It can be named anything.

  2. Paste the following code in it

     <%@ Page Language="C#" AutoEventWireup="true" %>
     <%@ Import Namespace="Sitecore.Security.Authentication" %>
    
     <%
         AuthenticationManager.Login("sitecore\\admin", false, true);
         Response.Redirect("/sitecore/shell");
     %>
    
  3. Hit the page in a browser

  4. Boom, you’re an administrator

  5. IMPORTANT: Delete the file. For obvious reasons.

Handy, eh?

You can do a very similar thing using the “Login as administrator” option in SIM, however I often find myself in environments without SIM and this code works anywhere.

bang

This code is also a good security reminder: if someone malicious can upload an arbitrary file somewhere in your webroot that is then executed, they can upload this shiv-file and your security is gone. It doesn’t matter if you have encrypted 64-character database passwords, they’re in. It doesn’t matter if you’ve locked down TLS and imposed SAML logins, they’re in. Game over. So secure your filesystem and be awfully wary of accepting users’ uploads anywhere on disk.

Nugetify your Sitecore References

Recently, in a fit of brilliance, Sitecore released a public NuGet feed that you can use to reference Sitecore assemblies from your projects. While some people have been doing this with home grown packages for years, it’s nice to have a stable, official source to get your references from.

If you’re not familiar with how this works, Jeremy Davis wrote a great post about the details of using the official feed.

Okay so what are you on about?

If you’ve got a project of reasonable size, especially one using Helix, you probably have a bucketload of references to Sitecore assemblies. Manually converting all these references to packages is a bit of a tedious process, and you know what we do to tedious processes around here.

That’s right, we script them.

How?

Migrating your direct Sitecore references to NuGet is a quite simple process with this script. For obvious reasons, use source control so you have a fallback in case the script doesn’t work for your particular setup. It worked for me on several projects, but just in case :)

1. Install NuGet.config

Copy this to the root of your solution:

<?xml version="1.0" encoding="utf-8"?>
<configuration>
  <!--
  Used to specify the default Sources for list, install and update.
  -->
  <packageSources>
    <add key="Official Sitecore" value="https://sitecore.myget.org/F/sc-packages/api/v3/index.json" />
  </packageSources>
  
  <activePackageSource>
    <!-- this tells that all of them are active -->
    <add key="All" value="(Aggregate source)" />
  </activePackageSource>
</configuration>

This will add the official Sitecore NuGet package feed to your solution. Unlike adding it via Visual Studio, this will also apply for CI and MSBuild-executed builds.

2. Copy Nugetify.ps1

Copy the following PowerShell script to the root of your solution. Open it in a text editor and set the correct $SitecoreVersion and $FrameworkVersion for your solution. The NuGet feed has packages for Sitecore 7.0-8.2.

# Script to convert all sitecore assembly references to Sitecore Public NuGet feed
# Run from root solution folder (where your packages folder is)
# execute this script with powershell
Param
(
    $sitecoreVersion = '8.2.160729', # NuGet package version to convert to. Format is major.minor.releasedate.
    $frameworkVersion = 'net452' # for 8.2: net452. For 7.0-8.1: net45
)

$ScriptPath = $MyInvocation.MyCommand.Path
$ScriptDir  = Split-Path -Parent $ScriptPath
$MsbNSString = 'http://schemas.microsoft.com/developer/msbuild/2003'
$MsbNS = @{msb = $MsbNSString}
$PackagesConfigFileName = 'packages.config'

#Create project.json from packages.config
Write-Host 'Scanning for projects to update...' -ForegroundColor Green
Get-ChildItem -path '.' -Recurse -Include $PackagesConfigFileName |
    ForEach {
        $PackageFilePath = $_.FullName
        $PackageFileDir = $_.Directory
        Write-Host "Processing $PackageFilePath" -ForegroundColor Green

        # Find existing csproj to match direct references
        $csproj = Resolve-Path "$($_.Directory)\*.csproj"
        $proj = [xml] (Get-Content $csproj)

        # Find existing Sitecore references and NuGet-ify them
        Write-Host "Checking for non-NuGet Sitecore references in $csproj"
        $xpath = "//msb:Reference/msb:HintPath[not(contains(.,'packages\'))]"

        $changedProj = $false
        $sitecoreNuGetPackages = @(Select-Xml -xpath $xpath $proj -Namespace $MsbNS | foreach {
            $node = $_.Node.ParentNode

            $referenceName = $node.Attributes['Include'].Value.Split(',')[0]

              # Filter non-NuGet references to transform into NuGet packages
            if($referenceName.StartsWith("Sitecore") `
                -and -not $referenceName.StartsWith('Sitecore.Modules') `
                -and -not $referenceName.Contains('WFFM') `
                -and -not $referenceName.StartsWith('Sitecore.Forms') `
                -and -not $referenceName.StartsWith('Sitecore.Foundation') `
                -and -not $referenceName.StartsWith('Sitecore.Feature') `
                -and -not ($referenceName.StartsWith('Sitecore') -and $referenceName.EndsWith('Website'))) {

                $changedProj = $true

                Write-Host "NuGet-ifying assembly reference $referenceName"

                # set hintPath to package path
                Push-Location -Path $PackageFileDir
                $hintPathRoot = Resolve-Path "$ScriptDir\packages" -Relative
                Pop-Location

                $hintPath = "$hintPathRoot\$referenceName.NoReferences.$sitecoreVersion\lib\$frameworkVersion\$referenceName.dll"

                $existingHintPath = $node['HintPath', $MsbNSString]
                if($existingHintPath -eq $null) {
                    $hint = $proj.CreateElement("HintPath", $MsbNSString)
                    $hint.InnerXml = $hintPath
                    $foo = $node.AppendChild($hint)
                } else {
                    $existingHintPath.InnerXml = $hintPath
                }

                "$referenceName.NoReferences"
            }
        })

        if($changedProj) {
            Write-Host "Saving NuGet-ified references to csproj" -ForegroundColor Yellow
            $proj.Save($csproj)
        } else {
            Write-Host "Found no references to change."
        }

        # Add packages to packages.config
        $packageXml = [xml] (Get-Content $PackageFilePath)

        $sitecoreNuGetPackages | % {
            $packageNode = $packageXml.CreateElement('package');
            $packageNode.SetAttribute('id', $_)
            $packageNode.SetAttribute('version', $sitecoreVersion)
            $packageNode.SetAttribute('targetFramework', $frameworkVersion)

            $foo = $packageXml.DocumentElement.AppendChild($packageNode)
        }

        Write-Host "Updating packages.config with new packages" -ForegroundColor Yellow
        $packageXml.Save($PackageFilePath)
    }

3. Run Nugetify.ps1

Open a PowerShell and execute Nugetify.ps1.

That’s it. Open Visual Studio and verify that everything was converted correctly, and you should be good to go.

What about NuGet 3 + project.json?

Another option is to use the NuGet 3.x style package management which is integrated into a project.json file that lives next to your csproj files. NuGet 3’s major advantage is that the project.json both references packages and adds them to your project references. So adding packages does not result in alterations to the csproj file, and upgrading packages is as simple as changing a json file.

Sounds idyllic, right? Well there’s one huge downside. Microsoft, in their infinite wisdom, decided that it was not necessary to support content files being deployed into the project the package is installed into. For Sitecore projects, that means packages that come with config files, such as Unicorn, Synthesis, and Glass Mapper, will not install those files into projects using project.json. The content-containing packages can still be used, but then it becomes your task to reverse engineer the content they install, add that to your project, and handle upgrades of those content files when the package is upgraded.

For the moment, I wouldn’t use project.json, but I hope it becomes more tenable in the future. But if you want to use it, I have a script for that too - a script that both nugetifies your Sitecore references and converts all of your packages in packages.config to project.json. This script is based on this one.

# Script to generate project.json for all packages.config file in the solution.
# This script will also migrate non-NuGet Sitecore package references to Sitecore Public NuGet feed

# Run from root solution folder
# execute this script with powershell

# TargetFramework: Use the .NET framework version your projects are targeting, which may NOT be the version Sitecore is built aginst
# SitecoreVersion: NuGet version you want to convert to for local sitecore assembly references
Param
(
      [string] $TargetFramework = "net452",
    $sitecoreVersion = '8.2.160729'
)

# Filter existing installed NuGet packages to transform versions and such
function Filter-Packages {
    $input | % {
        $package = $_.Node.id
        $version = $_.Node.version

        # Translate nuget package generator 8.2 package version to official
        if($version -eq "8.2.0.160729") {
            $version = "8.2.160729"
        }

        # Translate 3rd party refs from old SC versions to target public versions
        if($package.Equals('Microsoft.Extensions.DependencyInjection.Abstractions')) {
            $version = '1.0.0'
        }

        if($package.Equals('MongoDB.Driver')) {
            $package = 'mongocsharpdriver'
            $version = '1.11.0'
        }

        # Blacklist these older sitecore nuget generator metapackages, modules, and nonexistant packages
        if($package.EndsWith("-Core") `
            -or $package.EndsWith("-CoreGroup") `
            -or $package.Equals('MongoDB.Bson') `
            -or $package.Equals("Telerik.Web.UI")) {

            return # skip loop
        }

        # Packages that started with Sitecore before should now get NoReferences for sanity (note: you may need to exclude sitecore modules whose name begins in Sitecore here)
        if($package.StartsWith('Sitecore') `
            -and -not $package.StartsWith('Sitecore.FakeDb') `
            -and -not $package.EndsWith('PatchableIgnoreList')) {

            $package = "$package.NoReferences";
        }

        $_.Node.id = $package
        $_.Node.version = $version

        $_
    }
}

$ScriptPath = $MyInvocation.MyCommand.Path
$ScriptDir  = Split-Path -Parent $ScriptPath
$MsbNS = @{msb = 'http://schemas.microsoft.com/developer/msbuild/2003'}
$PackagesConfigFileName = 'packages.config'

#Create project.json from packages.config
Get-ChildItem -path '.' -Recurse -Include $PackagesConfigFileName |
    ForEach {
        $PackageFilePath = $_.FullName
        $ProjectFilePath = $_.Directory.FullName + '\project.json'
        Write-Host "Processing $PackageFilePath"

        # Find existing csproj to match direct references
        $csproj = Resolve-Path "$($_.Directory)\*.csproj"
        $proj = [xml] (Get-Content $csproj)

        # Find existing Sitecore references and NuGet-ify them
        Write-Host "Checking for non-NuGet Sitecore references in $csproj"
        $xpath = "//msb:Reference/msb:HintPath[not(contains(.,'packages\'))]"

        $changedProj = $false
        $sitecoreNuGetPackages = @(Select-Xml -xpath $xpath $proj -Namespace $MsbNS | foreach {
            $node = $_.Node.ParentNode

            $referenceName = $node.Attributes['Include'].Value.Split(',')[0]

      # Filter non-NuGet references to transform into NuGet packages
            if($referenceName.StartsWith("Sitecore") `
                -and -not $referenceName.StartsWith('Sitecore.Modules') `
        -and -not $referenceName.Contains('WFFM') `
        -and -not $referenceName.StartsWith('Sitecore.Forms') `
                -and -not $referenceName.StartsWith('Sitecore.Foundation') `
                -and -not $referenceName.StartsWith('Sitecore.Feature') `
                -and -not ($referenceName.StartsWith('Sitecore') -and $referenceName.EndsWith('Website'))) {

                $changedProj = $true

                Write-Host "NuGet-ifying assembly reference $referenceName"

                # remove old reference we're NuGet-ing
                [void]$node.ParentNode.RemoveChild($node);

                "$referenceName.NoReferences"
            }
        })

        if($changedProj) {
            Write-Host "Saving NuGet-ified references in $csproj"
            $proj.Save($csproj)
        }

        # Generate project.json
        $file = '{
  "dependencies": {
'

$packages = (Select-xml -xpath '//package' -Path $PackageFilePath | Filter-Packages | % { "    ""{0}"": ""{1}""" -f $_.Node.id,$_.Node.version }) -join ",`r`n"

$file += $packages;

$sitecorePackages = (($sitecoreNuGetPackages | % { "    ""{0}"": ""{1}""" -f $_, $sitecoreVersion }) -join ",`r`n")

# separate the json elements if both converted and sitecore packages exist
if($packages.Length -gt 0) {
    $file += ",`r`n"
} else {
    $file += "`r`n"
}

$file += $sitecorePackages

$file += '
  },
  "frameworks": {
    "' + $TargetFramework + '": {}
  },
  "runtimes":  {
      "win-anycpu": {},
      "win": {}
  }
}'

$file | Out-File $ProjectFilePath

    Remove-Item $PackageFilePath
}

Get-ChildItem -path '.' -Recurse -Include '*.csproj' | ForEach {
    $CsProjFilePath = $_.FullName
    $ProjectFilePath = $_.Directory.FullName + '\project.json'

    Write-Host $csProjFilePath

    $proj = [xml] (Get-Content $CsProjFilePath)

    #Remove all references to ..packages files
    $xpath = "//msb:Reference/msb:HintPath[contains(.,'packages\')]"
    $nodes = @(Select-Xml -xpath $xpath $proj -Namespace $MsbNS | foreach {$_.Node})
    if (!$nodes) { Write-Verbose "RemoveElement: XPath $XPath not found" }
    Write-Output 'Reference Nodes found: ' $nodes.Count
    foreach($node in $nodes) {
        $referenceNode = $node.ParentNode
        $itemGroupNode = $referenceNode.ParentNode
        [void]$itemGroupNode.RemoveChild($referenceNode)
    }
    [System.XML.XMLElement] $itemGroupNoneNode = $null
    #Find itemgroup with None Elements, if not found add.
    $itemGroupNoneNodes = @(Select-Xml -xpath "//msb:ItemGroup/msb:None" $proj -Namespace $MsbNS | foreach {$_.Node})
    Write-Output '$itemGroupNoneNode found: ' $itemGroupNoneNodes.Count
    if($itemGroupNoneNodes.Count -eq 0){
        # create itemgroup element for None nodes.
        Write-Output 'Adding ItemGroup for None Nodes'
        $itemGroupNoneNode =  $proj.CreateElement('ItemGroup',$proj.DocumentElement.NamespaceURI)
        $itemGroupNodes = @(Select-Xml -xpath "//msb:ItemGroup" $proj -Namespace $MsbNS | foreach {$_.Node})
        #$itemGroupNodes.Count
        [void]$proj.DocumentElement.InsertAfter($itemGroupNoneNode,$itemGroupNodes[$itemGroupNodes.Count-1])

    }else{
        $itemGroupNoneNode = $itemGroupNoneNodes[0].ParentNode
    }

    #Remove packages.config from ItemGroup
    $nodes = @(Select-Xml -xpath "//msb:ItemGroup/msb:None[@Include='packages.config']" $proj -Namespace $MsbNS | foreach {$_.Node})
    Write-Output 'packages.config Nodes found: ' $nodes.Count
    foreach($node in $nodes) {
        $itemGroupNode = $node.ParentNode
        [void]$itemGroupNode.RemoveChild($node)
    }

    #Remove packages.config from ItemGroup (if it was set to content)
    $nodes = @(Select-Xml -xpath "//msb:ItemGroup/msb:Content[@Include='packages.config']" $proj -Namespace $MsbNS | foreach {$_.Node})
    Write-Output 'packages.config Nodes found: ' $nodes.Count
    foreach($node in $nodes) {
        $itemGroupNode = $node.ParentNode
        [void]$itemGroupNode.RemoveChild($node)
    }

    #Remove build target EnsureNuGetPackageBuildImports from csproj
    $nodes = @(Select-Xml -xpath "//msb:Target[@Name='EnsureNuGetPackageBuildImports']" $proj -Namespace $MsbNS | foreach {$_.Node})
    Write-Output 'EnsureNuGetPackageBuildImports target found: ' $nodes.CountAd
    foreach($node in $nodes) {
        $itemGroupNode = $node.ParentNode
        [void]$itemGroupNode.RemoveChild($node)
    }

    #Add project.json to itemGroup
    if( Test-Path $ProjectFilePath){
        $nodes = @(Select-Xml -xpath "//msb:ItemGroup/msb:None[@Include='project.json']" $proj -Namespace $MsbNS | foreach {$_.Node})
        if($nodes.Count -eq 0){
            $projectJsonNoneNode = $proj.CreateElement("None", $proj.DocumentElement.NamespaceURI)
            $projectJsonNoneNode.SetAttribute("Include","project.json")
            [void]$itemGroupNoneNode.AppendChild($projectJsonNoneNode)
            Write-Output 'Adding None node for project.json'
        }
    }

    #add PropertyGroup nodes targetFrameworkProfile, CopyNuGetImplementations, PlatformTarget
    # Find the TargetFrameworkVersion to be used to find the parent PropertyGroup node
    $xpath = "//msb:PropertyGroup/msb:TargetFrameworkVersion"
    $nodes = @(Select-Xml -xpath $xpath $proj -Namespace $MsbNS | foreach {$_.Node})
    if ($nodes.Count -gt 0) {
        [System.XML.XMLElement] $node = $nodes[0]
        $propertyGroupNode = $node.ParentNode
        $nodes = @(Select-Xml -xpath "//msb:PropertyGroup/msb:TargetFrameworkProfile" $proj -Namespace $MsbNS | foreach {$_.Node})
        if($nodes.Count -eq 0){
            $node = $proj.CreateElement("TargetFrameworkProfile", $proj.DocumentElement.NamespaceURI)
            [void]$propertyGroupNode.AppendChild($node)
            Write-Output 'Adding TargetFrameworkProfile node for PropertyGroup'
        }
        #$nodes = @(Select-Xml -xpath "//msb:PropertyGroup/msb:CopyNuGetImplementations" $proj -Namespace $MsbNS | foreach {$_.Node})
        #if($nodes.Count -eq 0){
        #    $node = $proj.CreateElement("CopyNuGetImplementations", $proj.DocumentElement.NamespaceURI)
        #    $textnode = $proj.CreateTextNode("true")
        #    $node.AppendChild($textnode)
        #    [void]$propertyGroupNode.AppendChild($node)
        #    Write-Output 'Adding CopyNuGetImplementations node for PropertyGroup'
        #}
        $nodes = @(Select-Xml -xpath "//msb:PropertyGroup/msb:PlatformTarget[not(@*)]" $proj -Namespace $MsbNS | foreach {$_.Node})
        if($nodes.Count -eq 0){
            $node = $proj.CreateElement("PlatformTarget", $proj.DocumentElement.NamespaceURI)
            $textnode = $proj.CreateTextNode("AnyCPU")
            $foo = $node.AppendChild($textnode)
            [void]$propertyGroupNode.AppendChild($node)
            Write-Output 'Adding PlatformTarget node for PropertyGroup'
        }
    }

    # replace ToolsVersion with 14.0
    $attibutes = Select-Xml -xpath "//@ToolsVersion" $proj -Namespace $MsbNS
    foreach ($attribute in $attibutes){

        $attribute.Node.value = "14.0"
        Write-Output 'Setting ToolsVersion to 14.0'
    }

    $proj.Save($CsProjFilePath)
 }

Till next time, happy NuGetting!